Scenario planning and pre production
- charlotte2006lr
- Sep 18, 2023
- 7 min read
Updated: Sep 29, 2023
18/09/23
The scenario on the film will be based on two friends who have not seen each other in a while. They meet up and end up finding an object that has powers and have to figure out what it does.
In my short film, I want it to be centred on two friends that bump into each other unexpectedly. They decide they have enough time for a quick walk over the field and catch up. One of them steps on a leaf that makes them disappear and go to where the leaf originates from. The other character looks around shocked and confused, looking in all angles to see where they vanished to. The character hears a noise next to them and the only thing around is the leaf. The character bends down to touch/pick up the leaf and disappears. The two characters reunite in the woods next to the tree where the leaf came off. They are shocked and confused and then have to figure out how to get back as it seems they are trapped by a forcefield (another dimension). The two friends decide it could potentially be a leaf that does the opposite of the leave that sent them there and must look for the other leaf. One friend find the leaf and simply by touching it gets back. The other sees she’s disappeared and has to look for the other leaf. When they get back they learn that they were missing for multiple hours instead of the 5 minutes that it felt like.
I want to use shots and camera movements such as; I want to start by using a mid shot to show each characters walking towards each other this could be done by using a backwards dolly movement, wide shot to show the characters and the environment they are in, midshot to show the characters hugging when the see each other again, over the shoulder/headshots/reaction shot to show the characters faces and the emotion they may be feeling after seeing one another again, I want a POV shot of the one of the characters walking (the ground below them) paired with a pan movement to have them look around ,I want to use a track movement to follow the girls walking, a low angle from the leaf’s perspective of when the characters are walking and the girl steps on it, then a reaction shot of the second character who has been left and an extreme wide shot to show she is alone. I want to filming to take place on the school field and in the woods around school.
Shot number | Type of shot | Interior/Exterior | Shot description/ movement |
1 | mid shot | Exterior | I want to use a mid shot to show each character (done twice) walking around at the same time, the characters could maybe be on their phones or looking around, I want the camera moving backwards whist the character moves forwards. |
2 | wide shot | Exterior | Using a wide shot could show the two characters getting closer together and eventually seeing each other. Could feature the characters both stepping into frame |
3 | reaction shot | Exterior | Reaction shots of each character’s face to show they are shocked and surprised to see each other. |
4 | mid shot | Exterior | Shows the characters running towards each other and embracing in a hug. Can be shot at a mid-angle. |
5 | over the shoulder shots | Exterior | Shows each characters faces and saying they feel happy to see each other, could be at a higher angle to be looking down on the characters. |
6 | midshot | Exterior | Showing the characters discussing that they have quick time to have a walk and a catch up. |
7 | POV shot | Exterior | The view of one of the characters walking, could show the characters looking down at their feet and then up and around at they’re surroundings. |
8 | track shot | Exterior | Following the characters from the side, following them as they walk. |
9 | low angle shot | Exterior | Looking up at the characters and shows the perspective of the leaf and may show the characters. |
10 | extreme wide shot | Exterior | Shows the characters and their surroundings, showing how the character is now alone and the other character is now gone. |
19/09/23
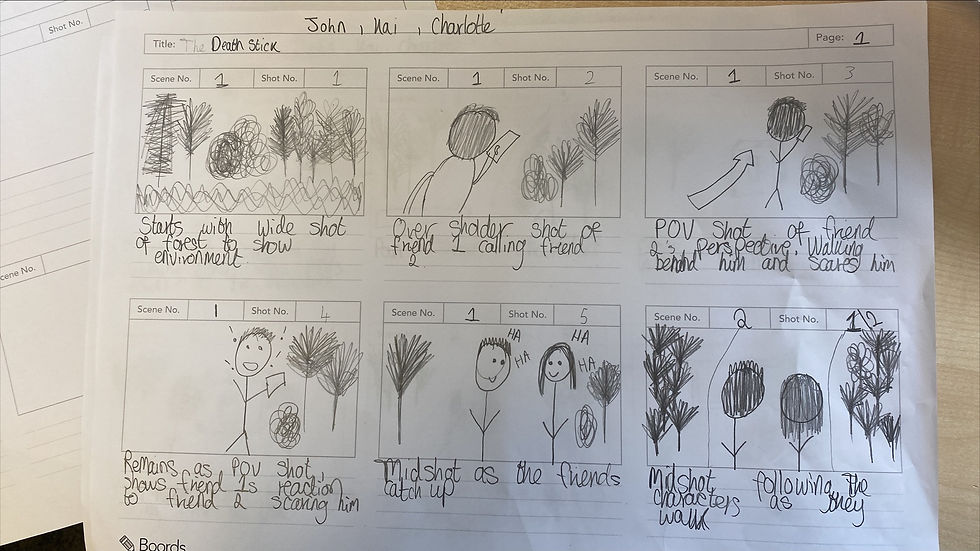
Kai, John and I went through each story and decided which one we were going to do as a film. We went with Johns story which was about two friends finding a USB stick that when is put in a laptop explains when the person will die.
My role is an actor and cinematographer in the making of the short film, John is director and Kai is a actor and cinematographer. This means that I will feature in the film as a character and will help with how the film is shot.
We started by going over the shots in the order they should be in.
As a group we began storyboarding, this gave an introduction to how the director and cinematographer viewed the script that had been written. This gave an introduction into shot types that will be used, location, props, characters and how the story is going to play out.


We created a risk hazard that meant we could limit risks of damage and injuries. It also meant that we were aware of what could happen during filming.

We created a location recce to explain and guide what is filmed where. This contains the exact address and location of where we film.
As a group, we went through what props were going to be needed over filming, when we needed to have them, what shots and scenes
Editing effects
Whilst filming and editing our scenario production we may use a different range of effects to make the production look better and more interesting. One of these could be a strobe lighting effect. This provides a clip with a flashing color effect to maybe create tension or effects.
To use the strobe effect on premier pro we take the clip we want to edit and drag it into the timeline. Whilst highlighted on the clip, go to the top right corner and go to the effects tab. After going to the effects tab, we open video effects and scroll down to the stylize folder. Once the stylize folder is open, scroll down to strobe light. Hold the strobe light section and drag it over to the clip and the effects control will pop up on the left hand side. To make it flash with a colour like demonstrated in my short film where my character gets hit by a vehicle and it flashes red, choose the option to operate on colour. Choose the colour you want it to flash and lower the duration so it flashes for shorter periods more frequently.
To make it so the flash bursts are more colour graded as a pose to being blocky (so can be seen through). Change the settings to blend with original and adjust the percentage so you can see through it better.
These steps create a flashing clip that can be used transparently or with colour.
Short film
Evaluation
Whilst creating our short film we did a range of things following the process. We were asked to follow a brief and create a scenario that we could then later film. Through the process we did tasks such as; a shot list where we thought about shots that we were gonna use, a storyboard which showed the ideas, shots and scenes, a risk assessment that explained the risks we may face when we go out filming, a location reece which explained where we showed where we would be filming scenes, a list of the props were using and a edit effects write up explaining one of the edits I used. Me and my group worked well together to get different things done, weather this be each of us doing a sheet and sharing them. We prepared by doing all of these different tasks and made sure everyone knew what they were doing, when they were doing it. As we decided to use Johns scenario to take forward, we assigned ourselfs roles. We all did a bit of everything - sharing the roles but we all did a position as a whole. John was director as it was his story but he also had a small role in the film. Kai was a cinematographer but had a leading role as a actor in the movie. I was a actor but also helped with what shots and angles would look good.
In the film, we used our knowledge of shots and camera movements to see what looked best. We demonstrated pan shots, POV shots, over shoulder shots and wide angles. I also used premier pro (editing with effects and audio for the first time) which showed the use of a glitch effect and a strobe lighting effect to add a bit of tension and emotion. I used the glitch effect to show that something is wrong and that when the USB stick is plugged in there is a certain thing that holds slight evil. I colour corrected the scenes to show that when the scene is grainy or dark coloured (low saturation and moving the vibrance down slightly) to once again show that there is something bad going on. In the scenes in the forrest i colour corrected these to make them warmer as at this time it is very innocent - two friends having a catch up and a walk. By adding the strobe lighting effect it once again symbolises the danger and that something bad has happened. By using the red flashes in the two scenes emphasise the danger. The biggest issue I faced was using premier as I had a couple of issues with it. I had never used premier pro to create a short film before so it was new for me to use. Once I had majority of my shots finished I put all of these into premier and moved them around to create the short film. However, I did not save my work as I did it and then my computer shut down and did not auto save - meaning I lost my work. I then faced issues about getting the clips from my folder onto premier so had to go to plus time to do it in school. Once I finished putting the shots in the correct order I started on editing. This was tough as I was unsure of where different effect folders were and how to make the transitions look seamless. I added my effects in and then started on audio effects. Finding audios was a struggle because I could not find any that worked well with the positioning of my clips. I also found it difficult to find Sound effects that were not cheesy and comedic. The hardest part of the whole process was the effects. Overtime I want to work harder on my use of effects and audio to create really cinematic shots that create a good story with (in the case of horror) good scare factor. If I could change one thing about my final film it would be making the effects better, using a less cheesy sound effect at the end and having more focused shots that blend better together seamlessly.
I followed the brief and filled out all forms that needed to be completed and made them fit in with our work. My favorite part of the scenario task was working with my group to find what looked best in scenes, how they could be cut and edited and how the shots were taken successfully. The most frustrating part I found in the process was the issues I faced with Premier Pro. Once I finished the short film I felt happy that I had done it but there is definitely things that I want to change and get to look better.
Comments